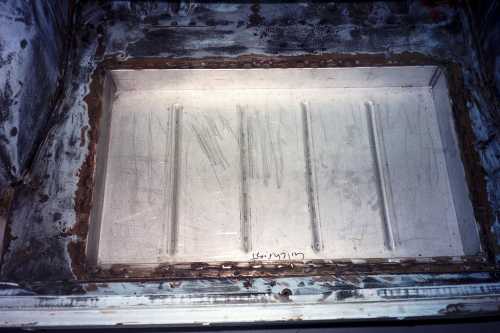
Doors - doors - doors - spent a few hours making swiss cheese out of the doors - 1 1/4" hole saw and a whole lot cutting fluid. About 100 holes per door into the frames - managed not to stuff the outer skins... I still have one frame to do then its about a days worth of finishing per door to get them ready for paint.... also removed the side intrusion bars from all the doors. Not sure of the wieght saving but I cant take much more out of the doors and have them still able to function as doors (and comply with the rule book - they must have a finished door card on them )-
nothing happens fast - but fast things do happen
w
Monday, November 13, 2006
Friday, November 10, 2006
Progress?!
Stunned! - Well I am tired out anyway - I spent all last week working on the car - The body shell has been sanded ready for paint - inside and out - engine bay and boot - awful nasty horrible job - I ended up with the compressors linked together giving 65 litres and 4.5 horsepower of pure puff.... enough to run a DA orbital sander and create much dust... the darn thing is ready for undercoat/primer... yay ( I also have no finger prints left)
Managed to take the beast outside lift it up on to its side (yes by my self - it weighs almost nothing now!) and finish the underside - seam welded and undersealed - its black and ready for a top coat of gloss black when the time comes - that has been on my list to do since I picked up the car four years ago! I even have photos to prove this effort of strength and application of black sticky stuff
The flares have landed - and the only need a little trim up to fit - and will be bolt on rather then be moulded on - much better for servicing and replacement....
Have the alloy sheet for the door cards and firewall sealing - fuel cell brackets are ready to be fitted along with the fuel pump - just need to cover them now!
all in all a good week - photos to follow - really...
w
This message, and any accompanying documents or files, contains confidential information intended for a specific individual or purpose. This emailed information is private and protected by law. If you are not the intended recipient, you are hereby notified that any disclosure, copying, or distribution, or the taking of any action based on the content of this information, is strictly prohibited. Please let us know immediately if you have received this by mistake and destroy this message. Taranaki District Health Board will not be contractually bound by the contents of any electronic mail originating from users of its computer facilities.
Taranaki District Health Board
(1T_S1)
No Viruses were detected in this message.
HealthIntelligence eMail Filter Service
Thursday, August 24, 2006
Picture Update


Finished and Painted Throttle assembly - Pedal tray with the newly fabricated throttle pedal - dont these old cars look ugly stripped back and being worked on - the flash dosent make it look any better either...
 fuel cell tray - in steel - I couldnt be bothered with alloy for this - I dont want the cell moving around and this will be plenty strong
 Seat in position - note parcel tray is gone
Front of drivers compartment and pedal tray
 Boot Well showing tubbing and fuel cell tray the other side is the same!
 Strut Top Mount - 8mm Steel and AN bolts!
Monday, August 14, 2006
update - progress or lack of it
Another week has dragged past and the 128 has had a bit more done on it - the Throttle pedal is finished - painted in black Hammerite it looks pretty okay actually - photos were taken I just need to get them from the camera to the blogg.
I will need to fabricate a mount for the cable but that will have to wait until the engine is in and I can work out what it is we are going to use. Ditto the return springs.
Spent some time with the sand paper and a bit of newtech body filler sorting out a few bits and pieces in the engine bay and boot wells - will continue on body prep for now as no money for the roll cage - doors are now back on the to-do list - as are a fire wall patches and fuel cell mounts/straps
All in all a weekend of pottering without much direction.... the more I do the more there is to do...
fun fun fun
ignore me I am rambling again......
This message, and any accompanying documents or files, contains confidential information intended for a specific individual or purpose. This emailed information is private and protected by law. If you are not the intended recipient, you are hereby notified that any disclosure, copying, or distribution, or the taking of any action based on the content of this information, is strictly prohibited. Please let us know immediately if you have received this by mistake and destroy this message. Taranaki District Health Board will not be contractually bound by the contents of any electronic mail originating from users of its computer facilities.
Taranaki District Health Board
(1T_S1)
No Viruses were detected in this message.
HealthIntelligence eMail Filter Service
Monday, June 19, 2006
throttled
so what do you do when your budget temporarily goes on a sabbatical? (also known as a kitchen) - keep doin stuff..... I am too far down this track to back off now....
so for this weekends fun I finished the camber plate mounts with some nice AN series bolts.... these are welded to the bottom of the mounts (cringe) I could have left them float but that would have made camber changes a real pain... as previously noted these camber plates are not the optimal in elegant solutions but we shall see - they do buy any additional 25mm or so of lowering by moving the attachment point above the original height of the tower mounts...
I also solved the small issue of the throttle pedal for the floor mounted pedal box.... take one uno turbo gear shifter (nice single plane bearing attached) apply a 1.5 meter length of roll cage tube and lean on it.... this gives a nice even curve.... chop the shift lever at the pivot bearing and shorten the free length chop the clevis off the top shifter linkage tube - linish flat and there you have the key component of the throttle pedal.... not as light is optimal but it was free!
next week - finish the throttle pedal with cable bell crank and base mount
I will also update the photos.... really
still following up on the blasted flares
later
w
Monday, May 29, 2006
Mission Creep
The camber plates are shaping up - they are not the smartest design in terms of bolt loadings - they sit on top of the towers and all the tension loads for the front struts to the body go through the nuts and thread lands (i.e. bolt is in tension - with reversing loads) so the holes are being reamed 5/16 and and close tolerance AN5-10 bolts being used with aircraft lock nuts and nordlock washers. I will lock the bolt heads in place - somehow
that's the good bit - the bad bit is that due to some project cost overruns in real life the roll cage is back on the deferred list - if I can sell a spare Volvo and probably my Mi16 Peugeot I f can get back into things but not right at the moment
work will continue on body prep - throttle pedal fabrication - steering shaft fabrication fuel tank location and set up plus resolving the flare issue. I will also need wheel studs and wheel bearings solid suspension bushes - steering pinion machining and brake calliper tidy up etc.....
T minus 3 weeks and holding
blast
w
Thursday, May 25, 2006
concrete dust
no real progress on the car - apart from finally getting the tie rod ends off the steering rack.... woohoo
I did however get my machine room linked to my vehicle bay (garage) via a nifty piece of controlled violence and a big hammer via the use of an even bigger grinder....
NB - for anyone contemplating cutting concrete without a water cooled blade - don't
it took 3 hours to clean the dust and rubble out of the sheds - the stuff gets every where..... abrasive crap
now have enough room and work flow to do things like fabricate parts without going outside to change my mind... this is important as it hasn't stopped raining since then! (5 days)
finished the cage concept drawings - this is not a simple one and will require a serious reality check by the cage builder - but once you start hanging the seat mounts off the cage tubes and then triangulate stuff to induce the stiffest and safest structure then things tend to get a bit complex - add steering column mounts and stuff like that and its a bit of mish...
next week - more sanding and seam sealing
3 weeks
Monday, May 15, 2006
Update - 12 months and counting
well it has been a year - one year since I said it would be 3 - 6 months until the car would be ready
one year - and its still not done
hmmmmmm
so - warwick - what has happened this week? I hear my loyal readers ask.......
Strut tops made - 8mm mild steel - now drilled ready for bolt fitting - just gotta work out what bolts are going into them - and I am really glad I am not welding the suckers on
Steering column extended - but not welded yet - will finalise that when we do the seat fitting part - thick walled 4130 with the std shite mild steel Fiat shaft machined down to fit its about 400mm longer then it was but that will reduce once we see where things sit
Stuff to do prior to cage
sand and seam seal the bits that will be impossible to get to once there is a jungle gym in place
find some tube to fit the Fiat Nydella rubberised bearings for the steering shaft and come up with picture to give the cage builder for the struts to mount it to the das bar of the new cage
Give the car a complete clean and blow off and send it on its way...
4 weeks to go
w
Monday, May 08, 2006
sticky
so how do you remove 30 year old glue from the cabin roof of a Fiat 128?
1 x angle grinder
1 x twisted wire cup brush (the real heavy duty ones)
1 x idiot
The idiot then dresses in full environmental exclusion clothing including woollen beanie and proceeds to spend an hour on a hot autumn day holding the angle grinder above his head and aersoling copious amounts of (probably) toxic crud - again - moron
Cabin roof is now pretty clever and ready for paint - yay
spent a bit more time sanding the interior and acid etching minor surface corrosion patches
Made templates of the front and rear quarters/wheel arch areas so I send them off to some fibreglass guys to find some flares that work... thinking Toyota TRD KP60/61 Starlet wide body ones - available and they are from the correct period.
Just need to sort out the camber plate/strut tower plates now...
Next week more sanding and then some seam sealing
booked in for the roll cage in 5 weeks (count them)
w
Friday, April 21, 2006
progress skewed
Well - things are happening slowly... but happening none the less.
- Pedal box tray welded in
- Fuel cell tray welded in
- patch in floor welded in
- started sanding the engine bay with the aim of prep sanding all the interior to the cage going in
- massaged left rear turret for coil-over install - right rear still to do
The pedal box tray got installed slightly off centre...by about 5mm (at the most) pure un-mitigated operator error - this will annoy me but will have no functional impact. Installed M8 Rivnuts for the willwoods to bolt up to.... had to fab up a tool as I was not going to pay $170 for a proper installer - mine was free.... and pulled the inserts up perfectly...
I will plod on with the various finishing - sanding - grinding - seam sealing and bashing things with a large hammer tasks (racing is such a precision sport) I *think* I have finished welding for now - yeah right
new email address for those who care - god does anyone read this stuff???
warwick dot gilchrist at xtra dot co dot nz
Monday, April 03, 2006
Smoke and Flames
Spent a Saturday afternoon creating dust and smoke - welded in a patch in the left front dash panel area and ground flat - removed the last roll cage footing from the old main hoop - need to patch a couple of holes from the previous welding efforts in this area.
Cut the boot floor out completely to allow the fitting of an 8 gallon fuel cell (small - but we only plan to run sprints/hill climbs and sprint circuit stuff - if we run enduros we just get to fill up lots!)
Chucked some zinc based primer on the front floor area and generally measured up for the pedal box mounts and fuel cell tray....
played chief timing manager for the Taranaki rally - lost a days fabrication and gained some good contacts - not a bad deal... good rally too
laters
w
Thursday, March 23, 2006
oh
you know, if you looked really carefully you could say something might have happened..... maybe.....
okay I welded a wee patch into the dash area on the left hand side (its on the lis, so tick one more thing off)
then burnt a hole in my hand
and kicked the sharp end of the trolley
- while not wearing gloves but while wearing my best safety jandals
so one hole patched on the car and two patched on me....
more this weekend - hopefully no blood this time
W
Monday, January 16, 2006
super-market-fiat-trolley
isn't summer nice? (or winter for those north of the date line) - tore myself away from the sun shine for few hours to fab up a little car trolley so that the Fiat can be moved around and loaded up to come home....
four caster wheels - a couple of lengths of tube and there you go (attached to the suspension pickups - nifty)
that's it
later
w
Subscribe to:
Comments (Atom)